Loading...

Night Audit Manual

Beginning Your Shift

Before you can begin work on the pre-roll tasks, you must first ensure that the following tasks have been addressed:

  • Clock in to Roubler
  • Complete handover with the PM shift
  • Count the till
  • Login to iHMS
  • Check/action emails and Duty Log where necessary
  • Check for Wake Up calls and set alarms in the Reception Phone
  • Lock the front door and put up the sign
Clocking into Roubler & Completing Handover
Clocking into Roubler

At the start of each shift, you must clock in to Roubler to ensure your hours are accurately recorded for payroll purposes.

  1. Use the PIN provided in your Roubler onboarding email to sign in.
  2. Select "Start Shift".
  3. Wait for the app to capture your picture.
Completing Handover with the PM Shift

The PM shift will have important information to share at the end of their shift. This may include:

  • Rooms checking out after the system rollover
  • Guests who may require special attention
  • Tasks that were not completed during their shift

Carefully note any items that need your attention and address them accordingly during your shift.

Counting the Till & Login to iHMS
Counting the Till

During your shift, it's necessary to count the till twice: once at the beginning and once at the end. This ensures the till remains balanced throughout your shift.

  1. Count the GSA float; the total should be $400. Inform the Duty Manager if there's any discrepancy.
  2. Open the document: M:\Operations\Front Office\New Shift Balance UPDATED JULY 2023.xlsm
  3. Switch to the "Fast Track" tab.
  4. Clear the previous shift's figures.
  5. Enter the float amount, broken down by denomination, in the "Till Count" section of the spreadsheet.
  6. Save the spreadsheet and keep it open for later use.
Logging into iHMS
  1. Open the iHMS bookmark in Google Chrome.
  2. Enter "HGCM" as the Property ID.
  3. Enter your username and password.
Check Emails & Wake Up Calls

Check/action Emails and Duty Log where necessary

Emails will come in throughout your shift and must be actioned as soon as possible to ensure guest satisfaction, as well as maintaining clear communication across all departments.

Promotions, expected deliveries, printouts, Function information, and plenty of other correspondence will come through the Reception email, and it is important that we keep on top of it.

There should be an icon for Outlook on the Taskbar, or it can be searched if necessary.

Answer all emails you are able to, and forward anything you're unsure of to the relevant department.

Once an email has been actioned, move it to the correct folder to ensure the inbox is always as clear as possible.

Check for Wake Up Calls and Set Alarms

Check the Wake Up Call sheet — which is hanging up on the left side of the front desk — for any wakeup calls in the morning.

If there are any wake-up calls to make, set alarms on the Reception phone for each time and room requiring a wake-up call.

Ensure to also set an alarm for 04:00 am to remind yourself to turn on the buffet.

Put Up The Door Sign And Lock The Front Door

At 11:00pm the door will have to be locked using the key at the left side of reception.

The sign for the door can be found in the drawer directly under the till

When a guest enters by buzzing instead of using their room key, perform a security-check by asking to check their key card.

But what is "Roll"?

“Roll” is when the system is balanced and updated for the next day of trade.

Certain tasks must be performed before the Duty Manager can roll the system, and the system must be rolled before you can finish your tasks; so it is important to work in unison with your Duty Manager to ensure all requirements are met before you can continue with your shift.

Generally, we aim to have the system rolled at 01:30am, giving us plenty of time at the end of the night to deal with any further issues which may arise.

There will be occasions where system roll is delayed, so while rolling at 01:30am is a preference, it is not necessarily a requirement.

BEFORE Roll

These are the tasks which must be completed before the Duty Manager can Roll the system for the next day.

It is important to complete these tasks first, as the other tasks involved in your role can either only be done after roll, or are not important to the rolling process.

  • Check for Pending Arrivals, Departures & Room Moves
  • Print the AR Pending Report & account for all transactions
  • Print out In House Checklist 1 & 2
  • Organise the Black Folder
  • Balance VIP Parking
  • Post Encore Cash & Credit Card transactions
  • Update Guest Registration Cards
  • Check for Back to back (B2B) bookings & update Tasks accordingly
  • Address any Pending Arrivals
  • Audit Transactions for the day
  • Balance your shift
  • Complete Audit and Cash Drop
Check for Pending Arrivals, Departures & Room Moves

The system cannot be rolled if there are still Check Ins, Check-outs or Room Moves waiting in the system.

While you will address the Pending Arrivals, the Duty Manager will take care of any Room Moves or Pending Departures.

In iHMS select:

  • Reports → Before Night Audit Reports → Expected Arrival Summary → PRINT the first page and check against the Guest Registration Cards in the box
  • Reports → Before Night Audit Reports → Expected Departure Summary → PRINT (unless empty) & give to Duty Manager
  • Reports → HouseKeeping → Live Scheduled Room Change → PRINT (unless empty) & give to Duty Manager
Print the AR Pending Report & account for all transactions

The AR Pending Report is a list of all of the Direct Bill transactions for the day.

You are required to print this report and ensure that the correct authorisation paperwork is accounted for.

In iHMS, select:

  • Reports → Accounts → AR Pending Report → PRINT.

Ideally, the required paperwork for this report will be in the "DBILL" section of the Black Folder.

If any of the paperwork is missing, search for it in the following places:

  • M:\Reservation Chargebacks
  • M:\Reservations Permanent Auth\*this year*

If you are still unable to find the correct paperwork, search the Folio Voucher number, Guest Name or Folio Number in the Reservations email

Highlight the Room Number, Folio Number & the amount billed on the AR Pending Report, and set it aside

Print out In House Checklist 1 & 2 Part 1

In iHMS select:

  • Reports → In House → In House Checklist 1 → PRINT. Keep this checklist aside, as you’ll be using it to note any changes required on Inhouse Checklist 2
  • Reports → In House → In House Checklist 2. Do NOT print the report yet.
  • Using the Binocular tool at the top of the window, search "INT PEND". This will show you all rooms with Segment errors that need to be corrected.
  • On the Checklist 1 printout, write "SEG" and note all INT PEND errors below it.
  • Returning to the search box, type "NOT APP". Check that the Nationality and Country are the same for each Region saying "Not Applicable". If for example the Nationality says "China" but the Country says "Australia" note it down on Checklist 1 under the heading "REG".
  • Use the search function to search for "AUSTRALIA". Ideally, there should be no instances where the Nationality and Country are different. If they are, note it on Checklist 1 under the heading "NAT".
Print out In House Checklist 1 & 2 Part 2

Now the errors you've noted down need to be fixed:

  • Open the folio for the first room noted under your SEG heading
  • Go to the "Marketing" tab
  • Change the Mkt Seg 4 dropdown to "Int Leis"
  • Continue down the list until all rooms have been updated

  • Region errors are fixed by entering the folio and changing the Region field in the Corporate tab. Australian Regions should always be an Australian state. Other countries should be noted as "Not Applicable"

  • Nationality errors are where the Country & Nationality on the folio do not match. Open the required folio, and change the Nationality or Country to match the other.

Note: If the Region is an Australian state, then both the Country & Nationality should be Australia. If the Region is "Not Applicable", the Country & Nationality should be a different country.

Organising the Black Folder

Beneath the left computer there is a cupboard labelled “DAILY TRANSACTION FOLDER”, in there you will find the Black Folder. The contents of the folder will need to be organised to make the auditing process easier.

Utilise the back bench space to arrange your items as follows:

  • To the far left, place any paperwork found in the “DBILL” section of the folder. Your AR Pending Report goes with this paperwork.
  • To the right of that will go the “AMEX” section, then “EFTPOS”, “JBC” & “UNION” (if any) and “VISA/MC”

The back wall should now have neat piles from left to right as follows:

AR Pending Report → American Express → Eftpos → JBC → UNION → Visa/MasterCard

Items from the “BALANCE” section can be placed in the right-most corner, which will be the “Day Bag” pile.

There will be two reports from F & B, one colourful one for Footlights and one for Encore. The Footlights report can go with the Visa/Mastercard paperwork.

Check the payments taken for the day on the Encore report, and photocopy an extra for each pile along the back wall where Encore took a payment of that type.

For example; if Encore took an Amex payment, an Eftpos payment and a Visa/Mastercard payment, you will need three copies of the report in total; one for the Amex pile, one for the Eftpos pile, and one for the Visa/Mastercard pile.

Room Service slips can be kept aside to be attached to the Room Service Supper & Delivery Reports during the Audit.
Balance VIP Parking

You will receive the VIP Parking sheet between 11:00pm - 12:30am, depending on the day.

  • In iHMS, look up the guest surname shown on the VIP Car Park sheet (check the Sharing Guest name as well). Select the “Additional Items” tab in the guest folio.
  • Type “Car” into the “Stock” section, then select “Car Park - Corporate” or “Car Park - Guest” and press enter.
  • Type the car registration under “Description” and note the room number on the Parking sheet.

When all the guests on the VIP Car Park sheet have been entered into iHMS:

Reports → In House → In House Additional Items Report → *Today’s Date* → Double-click “Car Park - Guest” → PRINT.

Reports → In House → In House Additional Items Report → *Today’s Date* → Double-click “Car Park - Corporate” → PRINT.

Reports → Before Night Audit Reports → Transaction for Business Day → PRINT any “Car Parking” sections.

Photocopy the VIP Car Park sheet (double-sided & colour). Give the photocopy and other printouts to the Duty Manager and place the original VIP Car Parking sheet on top of the water cooler or printer.

Post Encore Cash & Credit Card transactions

  • Check that the cash handed over by the Encore team is correct and place it into a cash envelope, making sure to write the correct details on the envelope.
  • Search "FOLIO" in iHMS. This will bring up all of the folios where payments are posted.
  • Double-click into the required Folio (AMEX/CASH/VISA etc)
  • Select the "Transactions" tab.
  • Right-Click and select "Payment".
  • Enter the payment amount in the “Pay Amount” section.
  • Check the "Opt-Out" box.
  • Enter "TRANS - [last 6 digits of RRN on receipt]" in remark section, then press Enter. EG: Trans - 123456
  • When all dockets have been posted, click “OK” in the top left, all folios should now = $0.00
Troubleshooting Cash & Credit Card Errors

If any of the folios have a dollar amount remaining on them, the first step is to go back to the Transactions tab in that folio and check that you haven’t missed a payment, or posted it more than once.

If all dockets have been entered correctly, check if there are any “CC Surcharge” postings. If there are, this means the “Opt-Out” box was not checked when posting a payment.

To correct these errors, follow the steps in the section “Reversals & Error Corrections”.

If neither of these is an issue, check if there is a dollar amount present on the RAPTOR POSTING ERROR folio. If there is, see the Correcting “Raptor Posting Errors” section

If you still can’t find the issue, request assistance from your Duty Manager.

Update Guest Registration Cards

Occasionally you will find Guest Registration Cards in the pigeonholes between the computers. You will notice that each pigeonhole is labelled, such as cards to be filed, cards to be updated and cards that need to be followed up on. You must check that these have been updated correctly in iHMS

  • Update the Phone Number and Email address.
  • Ensure that the “Payment Status” drop down has been updated to “Pre-Authorisation Obtained” and the “Deposit Amount” has been updated accordingly.
  • Check that the Sharing Guest has been added into the “Guests” tab.
  • Check that the Pre-Auth ID has been entered in the Check Out Instructions on the "Corporate" tab, and update any other notes in the Remarks section, such as if the bond is being covered by another room, etc.
  • Once all of these things have been updated, initial the CARD and UPD section on the bottom right of the Guest Registration Card and file it in the correct box under the bench on the right.
Note: Registration cards left in the "Follow Up" pigeonhole should be returned there after the details have been checked and updated.

This is because these guests need further attention for some reason, and will be followed up by Day Shift.
Check for Back to back (B2B) bookings & update Tasks accordingly

Occasionally, a guest will choose to extend their stay, meaning that they will be a Back-to-Back - or B2B - booking.

You will need to check for any B2B bookings and ensure the Task List is updated accordingly:

  • In iHMS set the date to the new Check In date.
  • Sort the guest names alphabetically.
  • Look for surnames in blue which have the same surname above or below in red. Confirm that the first name is the same, and then right-click on the blue folio.
  • Select "Add Message" from the options
  • Change the "Type" dropdown to "Task"
  • In the "Action" section, change the "To" dropdown to "Night Audit".
  • Change the Date to the incoming Check In date.
  • Write "B2B" in the message box and click "Next".
Address any Pending Arrivals

If there are folios that have not been Checked In, the system cannot roll. You must attempt to take a Pre-Authorisation for the first night’s stay for each room that has yet to arrive. This is best done at around 12:30 to ensure that guests have time to update their payment details if required.

On the Eftpos terminal:

  • Enter the amount for the first night's stay.
  • Select "Other" on the bottom left of the screen, then select "Pre-Authorisation".
  • Choose the "Manual" option. This will prompt you to enter the card details as shown on the reservation.
  • Enter the Card expiry date, then click through the CCV section, selecting "Unspecified" as the reason one wasn't provided.

If the payment is declined, the reservation will be cancelled as a "No Show".

If the payment is approved, the folio will be Checked In, changing the VIP code to "NOSHOW" and writing a remark such as "No Show (NON) pre-authorisation taken for one night".

Single night reservations will be charged and checked out, while multiple-night stays will need to be followed up by the AM team.

Audit Transactions for the day Part 1

The most important part of the Night Audit role is the Audit itself. It is important that everything in the venue is balanced, otherwise the system cannot roll.

In iHMS select:

  • Reports → Before Night Audit Reports → Transaction For Business Day → “Charge Date” Start & End Range Both Set To Today → “Postcode Range” Start At “Accomodation” → “Postcode Range” End At “Visa/Mastercard” → Enter → PRINT
  • These reports should be arranged as follows:
To Keep:
To Duty Manager:
To the Day Bag:
American Express ALL ENCORE pages Everything else
Eftpos ALL FOOTLIGHTS pages
Visa/MasterCard ALL ROOM SERVICE pages EXCEPT "Supper" & "Delivery" pages
(Any card payments) Movies

Once these reports have been placed in the Day Bag pile, you can move this pile to the Back Office, under the label “Day Bag”, which is between the two computers.

Audit Transactions for the day Part 2

Unstaple any payment receipts from the previous shifts Transaction for Business Day Reports and place them neatly back on the pile they came from. Throw away any previous Transaction for Business Day Reports to avoid any confusion, as you have just printed out the updated one.

Organise the payment receipts by room number as stated by each page of the Transaction for Business Day Report and highlight the amount & transaction number on the Transaction for Business Day Report page

Neatly staple the payment receipts to the corresponding Transaction for Business Day Report page (ie AMEX receipts to the American Express page, etc)

Once completed, create a new Day Bag pile with the transactions sorted alphabetically (AR Pending on top, Visa/Mastercard at the bottom)

Balancing your shift
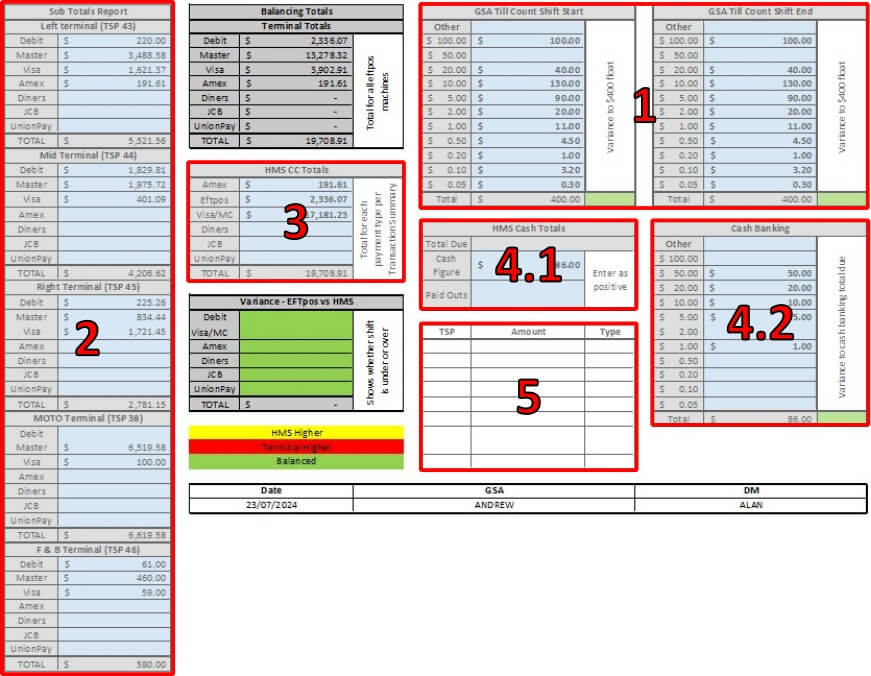
  1. If you haven't already, enter the till count for the start of your shift in the "GSA Till Count Shift Start" section. Then, enter the updated till count in the "GSA Till Count Shift End" section.

  2. Print a Settlement Report from each Eftpos terminal: Menu → Reports → Settlement Enquiry → Print.

    Enter these details into the "Sub Totals Report" section, under the correct TSP number. (TSP numbers are on the front of each terminal).

  3. In iHMS go to Reports → Accounts → Tax Breakdown Summary. Enter today's date and print the report.

    These figures need to be entered in the "iHMS CC Totals" section, found in the mid-left of the spreadsheet.

  4. If you have taken Cash, enter the figures into the "iHMS Cash Totals" → "Cash Figure" section. Provide the cash breakdown in the "Cash Banking" section.
  5. If there are any Refunds, enter them in the Refunds section below the "iHMS Cash Totals" box.
  6. Print the Balancing sheet to the Back Office printer, in full colour.

The "Variance - EFTpos vs iHMS" section should all be green. If there are any discrepancies, the spreadsheet will tell you where to look. If you are unable to discern where the variance is, ask your Duty Manager for assistance.

Balancing Example

Below you will find an example of a correctly filled out balance sheet, marked in accordance with the previous steps.

Note the green boxes in each section. This spreadsheet is perfectly balanced.

Completed Balance
Complete Audit and Cash Drop

Complete any outstanding tasks, such as printing missing Eftpos receipts, tidying your workspace, or handing cash or reports to your Duty Manager.

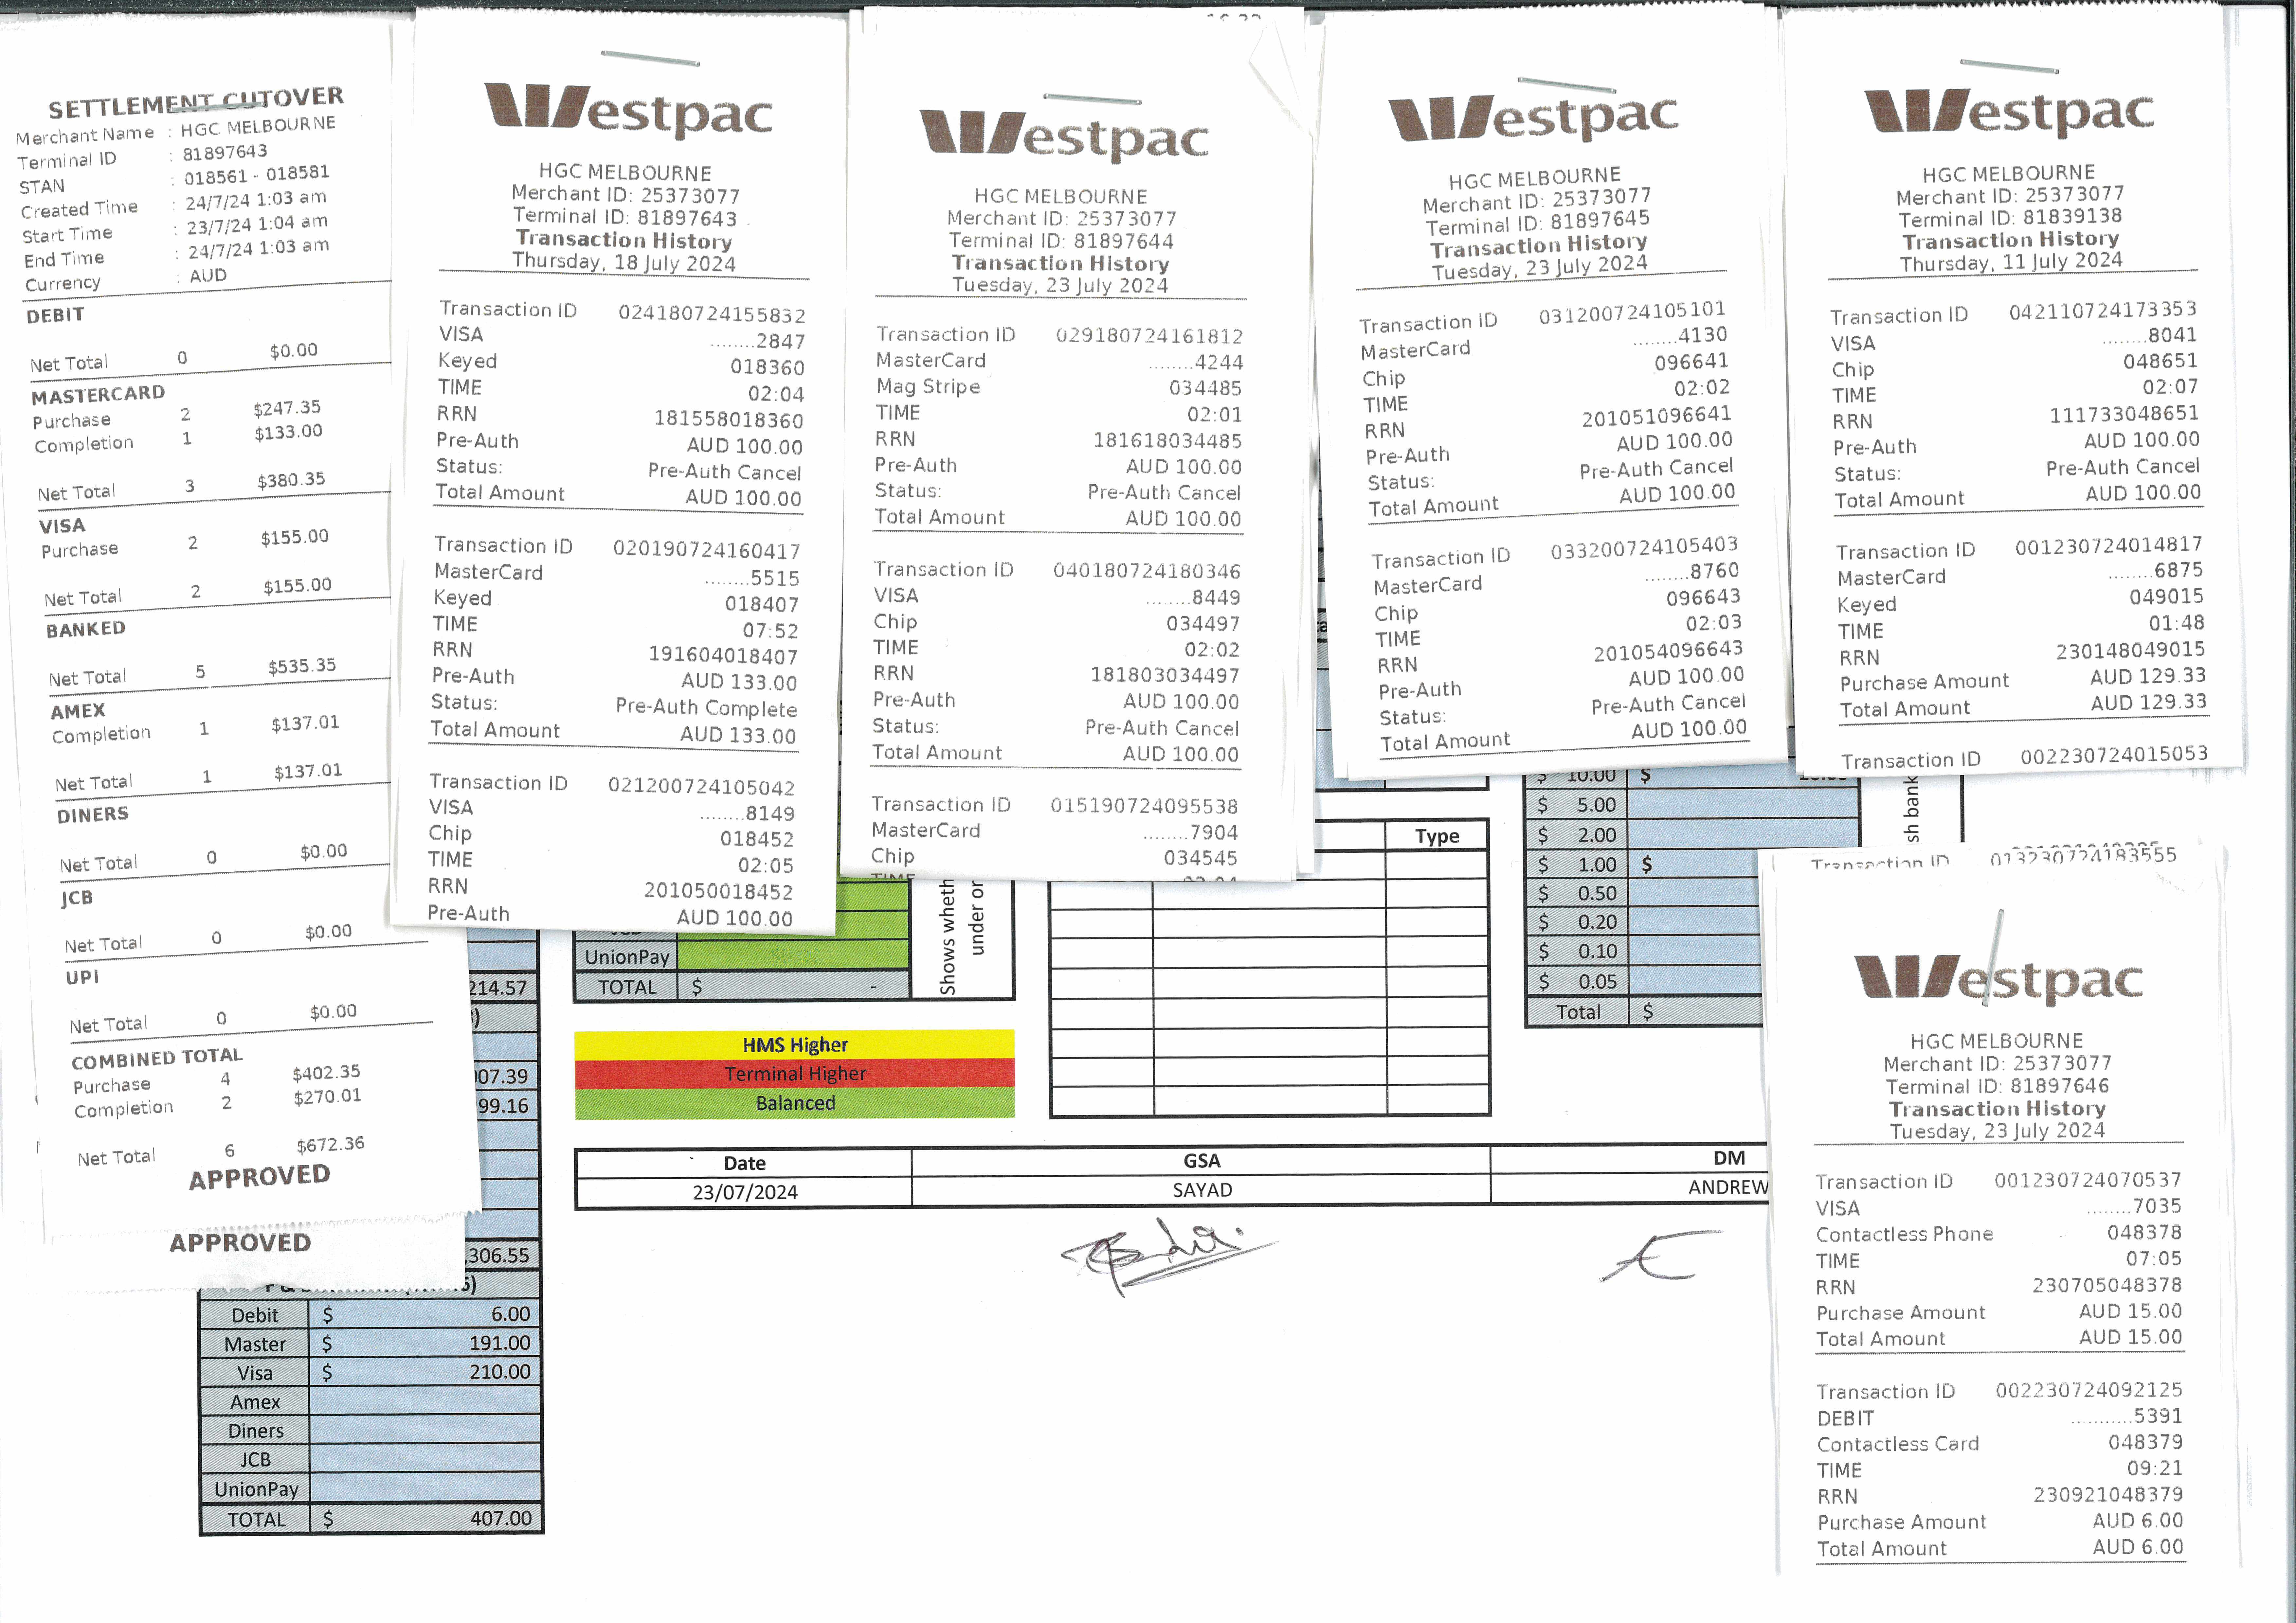
Print the Transaction History for each Eftpos Terminal: Menu → Transaction History → Print icon (top right) → Print.

Settle the Eftpos machines: Menu → Settings → Account → Settlement → Settle Now → "Yes".

Staple these printouts to the top of your Balance sheet, with the Tax Breakdown Summary stapled to the back, as shown in the next section.

Print your shift balancing report: Reports → Management Reports → Transaction by Staff → *Your Name* → *Date* PRINT

End your shift in iHMS: Setup → End shift

Enter the figures as shown on the Transaction by Staff sheet. Once your shift is ended, advise your Duty Manager that you are ready to roll.

Completed Balance sheet

This is how your final Balance sheet should look:

Completed Balance
AFTER Roll

These tasks can only be completed after roll, as certain things - such as parking, room charges etc - will not update until the system has been rolled over to the next day of trade

  • Login to iHMS and Start Shift
  • Top Ups
  • Chargebacks
  • Turn on the Buffet
  • Floor walk
Top Ups Part 1

When a guest has incidentals that amount to more than their $100.00 bond, we have to “Top Up” the bond to match.

For example, if a guest had dinner in Encore totaling $123.00, their bond will have to be Topped Up by $23.00.

  • Right-Click into each Checked In folio and select "Check-out View".
  • Check the “Instruction” tab for any notes about charges. ACB rooms will have All Charges made to the company or CC on file. RO covers Room Only, etc. See Special Instructions Guide for more information.
  • Arrange the charges as follows:
    • Accommodation in the top left.
    • Incidentals (Room Service, Cash Bond, Encore, Footlights, etc) in the top right.
    • Mistakes and $0 charges in the bottom left.
Note: if the bottom left ledger doesn't allow you to add things to it, you need to create a “DUMMY” ledger.

Select the Guest’s name in the top right then use the down arrow on the keyboard. Type “DUMMY” into the field and click the three dots to the right.

A pop-up will come up, select the “Guest” radio button and click “SEARCH”. Double click the first option, which will state the country as Aruba.
Top Ups Part 2

After the charges have been arranged correctly, check the guest name in the top right of the pop-up to see if they require a Top Up (If ledger is OVER $100, top up by the amount that is over)

  • In iHMS, select: Reports → In House → In House Folio Limit Report → PRINT.
  • Highlight amounts in the far right column that are over $100 and keep an eye out for amounts under $100 in the left column, as these are odd and will need to be checked.
  • Check the TSP number on the Bond docket attatched to the required Guest Registration Card, and use the corresponding terminal to proceed with the Top Up:
  • On the Eftpos terminal: Menu → Search Transactions → Enter 4-digit card number → View → Select transaction with same time → Adjust → update the amount → Submit.
  • Attach the Top Up docket to the Guest Registraion Card.
Note: If a Top Up is declined, advise your Duty Manager, then create a Cash item in the Additional Items section with a remark saying ***Top Up Declined***.

If the guest is staying multiple further days, prepare the below letter to be dropped off during Floor Walk:
M:\Operations\Front Office\Reception\Templates\Templates for guest letters\Pre-Authorisation Top Up Declined (Draft).docx
Chargebacks Part 1

You will need to charge all CC and DBA rooms that are checking out today.

To determine which rooms will need to be charged, print the Folio Special Instructions by Check-out Date Report at:

Reports → In House → Folio Special Instructions by Check-out Date Report → *Ensure Date Is Correct* → PRINT.

Highlight any "CC", "TRNSFR" "DBA" and "DBC" rooms. These are the rooms you will charge during this process.

CC Charges
  • Open SiteMinder in Google Chrome and login. Use the Voucher Number in the bottom left of the guest folio to search SiteMinder, then open the reservation.
  • Scroll down to the Credit Card details (bottom right of screen). If neede, click the eye icon to show the card details.
  • On the MOTO terminal: Enter the amount to be charged → Other → Manual Card Entry → Mail Order.
  • Use the card details provided by SiteMinder to complete the transaction.
  • Post the payment to the guest folio as you did with the Encore transactions earlier, writing the room number on the front of the payment docket, and the folio number on the back.
Chargebacks Part 2

DBA and DBC rooms are rooms that will be charged to an account, such as a business or even the hotel itself.

DBA / DBC Charges
  • In the Transactions tab of the guest folio, right-click and select Payment.
  • Change the Payment Type dropdown to DBILL, then click next.
  • If a Credit Stop/Cash Only error appears, you will need to email Reservations with the Folio number, guest name and a polite request to look into it.
Rooms marked "Transfer to":
  • Check the name of the folio the charges are to be transferred TO and note the folio number, then open the folio that needs to be transferred.
  • In the “Transactions” tab hold down “Ctrl” and select the items with a cost beside them, leaving the $0.00 items unselected
  • Right click and select “Transfer”
  • In the “To Folio” section, begin typing the surname of the folio the charges are being moved to, check that the folio number is correct then - when you are certain you are transferring to the correct folio - click “Next”.
Turning on the Buffet

At 4:00am the Buffet needs to be turned on for the Breakfast team

  • In the first cupboard under the buffet, flip the red switch.
  • In the third cupboard down, turn the dial to “HIGH”.
  • Flip the green switch on the plate warmer
Floor Walk

After turning on the Buffet, it's time to do floor walk.

Grab one of the trolleys from F & B, any letters you need to drop at rooms, and the Green Stay Checklist your Duty Manager gave you.

You must visit every floor, collecting Room Service trays, dropping letters and making a note of any rooms with a Green Stay hanger on the door.

You should also Note any Maintenance issues and hand them over to your Duty Manager, along with the Green Stay rooms, when you return from the walk.

Take the Room Service trays to the kitchen, clean any leftovers into the bin and arrange the dishes nicely for the Kitchen Staff.

Return the trolley to where you found it.

Before OR After Roll

There are a few tasks that can be done at any stage throughout the night, and are great for utilising your time while waiting for the Parking sheet or Encore documents:

  • Print The Expected Departure Summary Report
  • Print The Folio Special Instructions By Check-out Date Report
  • Organise The Departure Reg Cards For The AM Shift
  • Pre-Auth Cancellations For The Previous Day
  • Action Room Service as Required (Night Owl Menu)
  • Prepare For The AM Shift
Print Reports for Departures

Print The Expected Departure Summary Report

(If you are doing this before roll, make sure to update the date to tomorrow)

Reports → Departures → Expected Departure Summary → *Ensure Date Is Correct* → PRINT.

Staple together, fold in half and put in the departures box.

Note: Use this list or the "Folio Special Instructions by Check-out Date Report" to collect the reg cards which need to be moved to the Departures box for the morning team.

Print The Folio Special Instructions By Check-out Date Report

(If you are doing this before roll, make sure to update the date to tomorrow)

Reports → In House → Folio Special Instructions by Check-out Date Report → *Ensure Date Is Correct* → PRINT.

Highlight any "CC", "TRNSFR", "DBA", and "DBC" rooms.

These rooms will be paid using the "MOTO" Eftpos machine and the details provided on the guests' registration card.

Note: Use this list or the "Expected Departure Summary Report" to collect the reg cards which need to be moved to the Departures box for the morning team.
Organise The Departure Reg Cards For The AM Shift

Part of the Night GSA role is preparing the Departures bin for the AM team.

Use the Expected Departure Summary Report or the Folio Special Instructions by Check-out Date Report to remove the required Guest Reg Cards from the storage bins under the desk.

Organise these Reg Cards into each section of the black Departure bin to the left of the middle computer

Pre-Auth Cancellations For The Previous Day

The Guest Registration Cards for the day's Departures will be next to the right-most computer

You will find the Pre-Auth dockets for each room's bond attached to the back of each Guest Registration Card.

Go through and Cancel all Pre-Auths from yesterday's check-outs on the eftpos terminal:

Menu→Search Transactions →Enter 4-digit card number →Select same time →Cancel →Not Specified→ Submit.

Staple the cancellation docket to the back of the Guest Registration Card.

When all have been cancelled, wrap a Rubber Band around the pile and put it in the bottom drawer of the filing cabinet in the Back Office.

Note: Do NOT cancel any pre-auth for rooms with issues or outstanding balance.
Action Room Service as Required (Night Owl Menu)

If any guests call for room service it is your job to prepare and cook the room service and take it to the room.

The Night Owl menu is available 22:00 - 11:00; there are instructions in the kitchen for how to prepare each dish.

If you are ever unsure about a meal or drink, ask the Night Manager.

When you take the order, make sure to check if the guest is paying cash or having the items charged to the room, if the guest is paying cash, take payment for the room service on delivery.

If it's a room charge, make sure to Manual Post all of the items under the correct codes in iHMS (“Room Service Food Supper” = Food, “Room Service Beverage Supper” = Drinks & “Room Service Delivery Fee” is always $5.00)

Note: Our Liquor License ends at 01:00am Monday - Saturday, and 11:00pm on Sunday's. This means that wecannotserve alcohol after those times
Prepare For The AM Shift

Top up the paper in all of the printers. If you run out of paper reams, use the red GSA bracelet in the key box to go up to the admin offices to find another box

Refill all of the staplers. Staples can be found in the drawer beneath the middle computer

Top up the business cards on the counter. More cards can be found in the cupboard under the middle computer

Tidy the back office and luggage room

Ensure there are enough pre-printed Misc. slips, Bond Information slips, Charge/Reversal Slips and Room Service slips. Where necessary, print and cut more to size using the templates in:

M:\Operations\Front Office\Reception\Templates\Templates for FO

End of Shift

At the End of your shift, you will need to do the following:

  • General Cleaning
  • Remove Door Sign And Open the front Door
  • Count till ($400)
  • Balance Your Shift
  • Complete Handover with AM team
  • File Checklist in the correct folder
  • Sign out of Roubler
General Cleaning

There are a few small cleaning jobs which should be performed every night:

  • Vacuum the Reception area and Back Office.
  • Wipe down the Reception benches and the tabletops in the Lobby area.
  • Clear away any staff dishes.
  • Clean up the cupboard under the stairs
  • Tidy the Luggage Storage Area, including removing stickers from the ground.
Remove Door Sign And Count the Till
Remove the Door Sign & Open the Door

At around 07:00 am, the front door can be unlocked.

Remove the sign, and turn the key clockwise to "Auto".

Return the sign to it's spot underneath the till.

Count till ($400)

As you did earlier in the night, count your till to ensure it balances to $400.

Invetigate any discrepancies.

Alert your Duty Manager if there are any variances.

Update the till float register

Balance Your Shift

As before, use the Balancing spreadsheet to balance your shift

This time, change the tab to "Night Morning".

Print any Eftpos Settlment Enquiries with figures on them and fill in the correct TSP details. DO NOT settle the terminals this time.

Complete the sheet in exactly the same way, print off the Tax Breakdown Summary and staple it to the back.

Staple the Settlment Enquiries in the top left and sign at the bottom.

File this away in the Balance section of the Black Folder.

Complete Handover with AM team

Complete hand over with the incoming shift Duty Manager; ensure you make them aware of anything that needs following up from your shift or anything they need to be aware of and remember.

Also do a handover with the AM shift GSA; pass on any information that will be important on their shift.

Important items to handover are:

  • ACB rooms that will need to be charged by the AM team
  • No Shows that need to be followed up on
  • Anything your Duty Manager suggests to pass to the AM team.
File Checklist & Sign Out of Roubler

Ensure any extra paperwork like the Task List is stapled to the back of your checklist and file it in the correct folder in the cupboard in the back office. Ensure you file it under the correct date (yesterday’s date)

Use the pin provided in your Roubler onboarding email to clock out of Roubler.

In closing

Night Audit can be a mentally demanding task, and can seem very daunting in the beginning.

It is important to remember that mistakes are how we learn, and you'll have many opportunities to learn how to fix any problems you come across.

Always be sure to ask if you're not sure about something, and be willing to learn something new wherever possible.

For more information on how to address issues you may come across, see the Night Audit Tips & Tricks page.

1 of 50